Showing posts with label action figures. Show all posts

Sunday, 27 March 2011

Happy Customs Anniversary!


This week it is one year since I put brush to plastic in taking an existing action figure and turning it into a fun and sometimes rather silly little man that I get a certain amount of creative satisfaction from.
Since being a teen I have held an interest in art and artists and at one point was sure I was going to make it into a career for myself.
Then I took a different direction and it became a hobby.  But a hobby I was made to stop… so then I went into photography, but this was expensive!! So I packed it all away as time and money was short and life got in the way.
I wanted to create something which would challenge me and something which hasn’t been made by a major industry. If it all went tits up!, it didn’t matter… as long as I had fun making it and I found that piece of me which was the love of being creative again.
So the past 12 months in the world of customising has amazed me, from the artistic talent of some folk to how weirdly possessive, competitive and serious some people get about sharing how they have made things.
 I guess it takes it all sorts…
The more I look into it the more I get sucked into it, then the ideas start to flow!
Sadly, at the moment, my ideas are greater than my creative ability but I am never adverse to at least trying and learning from the mistakes I make.
With guidance, I feel my customs have come on in leaps and bounds as I get honest and constructive feedback from two customizers whose work I hold in very high regard.
So what have I have learnt?;
YELLOW PAINT!! Argh… I hate yellow paint. It is so streaky and thin and takes many coats to get a smooth and even cover. I really do hate it and I never noticed before customizing how many superhero/villains have the dreaded yellow in their costumes!
It would be nieve to think one little man is like the other… even if looks exactly the same! It is not.
Paint reactions- It can feel and look like painting with oil on water. This is due to oils within the plastic, so I always give my little men a good soapy wash before starting anything which can help.
So my first custom was the mighty mort Spellbinder:  


He was major fun to try and do due to his wacky costume. He got me hooked; this is something I love doing, it is my time to unwind and relax…

So; how to celebrate 1 year was the question I was asking?


By making a BIG ASSED SPELLBINDER! That’s how!!


                                     Happy Customs Birthday To Me!

What I want to achieve in my 2nd year: Are to develop my emblems, rather than going freehand with them all the time so I want to explore the alternatives.
Sculpting- I enjoy it; I find it very very hard but fun, so I’m going to keep practicing.
And enjoy, watch and stay inspired by looking at the work of:
and


Monday, 14 February 2011

A Geek Girls Attempt At Sculpting, Take 2.

don’t hesit to work, and work, to ask some help to anybody in this job. to observe the nature, the master and to have a critic spirit on your work to do a better sculpt. and be patient.
Cyril Roquelaine.

Facebook can be a wonderful resource but from time to time there can be a point where it can make you cringe and feel like you want to slip between the cushions of the sofa and disappear like that 1988 TV remote control as you forget who you have on your friends list...it becomes a friend of friend of a friend etc..
After posting a link to my first attempts at sculpting I got chatting with a guy whom I have never really spoken to before but we have a mutual good friend and a love for comics and art and that mutual friend introduced us.
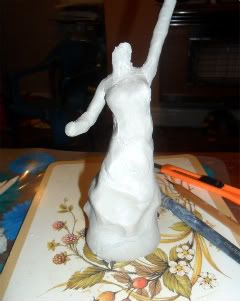
So with the help and guidance of sculptor Cyril Roqelaine I have attempted my second figure from scratch. Looking at it a totally different way from the first but still using the same material.
There are many many ways to creating little men and many many different materials to use, I just need to find the style and material which suits me the best…. Something which can only be done with trial and error and time.
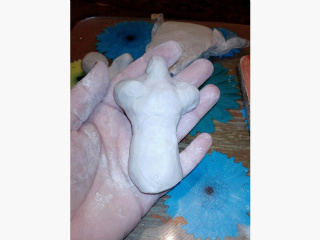
To create this one we took a classical approach by trying to vision the figure within the block of clay, you then start to cut out the shape you see and start to mould with your fingers as you go. This also gives a much more solid base to the figure as the torso and base are one.

Creating a female figure I found far easier than a male, the curves kinda suggest themselves and it is far easier to correct width than a more angular muscle based masculine form.
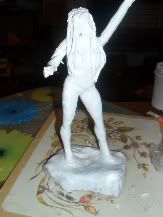
After kneading for a good hour I was ready to put knife to clay and decided to just go for it. I got the basic female shape which oddly resembled the statue of Liberty, in my head I knew what I was after. To my amazement the arm stayed in place in an upright position rather than flopping down.


This was due to using the clay correctly and all the kneading with the compounds and nylon gives it extra strength.
After the basic shape I kept the remaining clay wrapped in cellophane and then a damp cloth this stops it form drying out whilst letting the sculpted material dry out.
Then a basic head shape was placed and smoothed onto the neck using very little water, damp fingers… legs and feet only suggested as the stay within the main block.


After watching workshop clips which left me somewhat … WOW!  And a little hesitant to share what I was doing, it was pointed out to me to take things very laterally, don’t look at faces as features look at them as lines and shapes, break it all down, same with forming body parts.
The classic female in comics has very little detail, some hardly have a nose, and the most enhanced feature seems to be the eyelashes which are the indication that it is female.  Thighs take the general () shape, so by using some basic symbols:   -,  \, /,  _,  O,  ^,  ~, .,  along a horizontal or vertical line a human shape can be formed.

So with step by step instruction via the wonder that is Skype! I went in for the kill with trying to get the face better than 711!!
Using my pointy metal tool only a horizontal line was created to indicate a brow, ^ for the nose a smaller horizontal line for the mouth and two slightly larger pin point indentations for eyes… that was it!!
Next was the hands, form a basic shape and used scissors to create a finger and the rest is suggestion with lines. Again to my amazement the finger didn’t drop off…
For sculpting the hair I used epoxy, as this is what I am now used to and like it’s slight adhesive quality.

Another valuable lesson I learnt was not to be too gentle with it, put some strength behind it as it won’t fall to bits.
I feel it is time to throw away my nail files for filing and starting using what the big boys use and have a play with different grains of sand paper as there is no way I can get this stuff smooth by using an emery board.
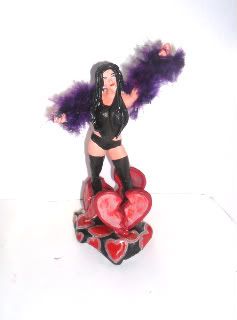
Otherwise everything else is painted on. Facial features again.. the bain of my life!! She doesn’t quite look irresisatble she has a kinda £10 Blackpool strip club look to her.
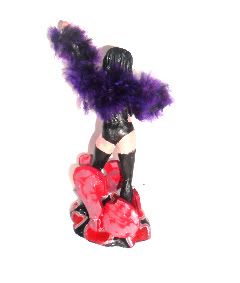
I wanted to add a burlesque feel so added texture with making her a feather boa and the base of standing on hearts whilst breaking out of them… Yeah! Symbolism baby!!


SO… Who is she??


This is the classic character known to Europe as CHICA BOOM BOOM!! And across the pond I believe she is known by CLARA DE NOCHE.
Originally appearing in the euro erotica books drawn by the superb JORDI BERNET. And then a somewhat tamed version in a Parisian newspaper strip.
I love the tongue and cheek strip, even though the backstory is the same, Chica is loved by ALL men, no man can resist her feminine charms and she exploits that to its full capacity, there is nothing she won’t do for money to make sure her son gets what he wants. She travels across the world breaking hearts….
So, my 2nd attempt at sculpting... if you view it from afar with a squint! It Looks OK…
I have learnt an awful lot in the two weeks I have been doing this and the most important lesson I have learnt is to be patient… rather than trying to do a full figure I am going to practice just heads and then move on to another part.

Getting the basics down… then I can move on to create something of worth.
So to all my geeky comic book, sci-fi, arty friends… HAPPY VALENTINES DAY!! May Chica break your heart? ;)

Sunday, 6 February 2011

A Geek Girls Attempt At Sculpting...

After finding the allure of Go Hero products and being given some new clay to try out I decided come rain or shine to try and create a little man from scratch.

I shall warn you now before you go any further, the end result is not for the faint of heart… but it could have gone tits up a whole lot more than it did.
Whatever the result was, I was going to document it.
I used nylon enforced clay with silicon. I must say it was a little strange to use, this stuff was hairy inside so made any kinda cutting hard as the fibres would stick to the blade.
 It was fairly pliable but I made many mistakes.  I was using it as I would Fimo and flying blind on how and where the best place was to start.
I had no special sculpting equipment so used my fingers, water, a cotton bud and a rubber tipped pastel pushing art tool.

Thinking of how plastic figures are put together I took each limb separately then attached by gluing…  not a good idea as the glue, even super glue does not stick!
 So using epoxy  to bond the pieces together which added extra length to each limb giving the appearance of swollen thighs and shoulders.
Muscles sure do take strange shapes...especially if you Google ‘human male muscle anatomy’ but mostly, if not all were not natural and bordering on the gross.
 A normally shaped male muscle formation is harder to find than one would think, so did it from my head instead. 2nd mistake…
I was using plenty of water to smooth the clay which in hindsight would have been better if it had just been sanded as too much water made the clay crack which weakened the whole thing to the point of toppling.
 Again… epoxy was used as a filler then filed down.

First step :  I decided to see if I could get a basic torso shape. I was channelling the idea of the DC Universe body, the way the shoulders round and the basic ^ shape for the neck.

I wanted to create something with movement.  I was hoping I could do this via creating texture within his clothes but at this stage of the game I am ahead of myself in ability.
The shoulders I tried to place one leaning back and the other slightly forward as in this guy’s comic appearances he spends the majority of it fighting.
Meh… it looked OK, so what next?


 I needed something to support it and build around.
Next were the base and two legs. You can see the slight cracking on the thighs which is what I was meaning by using too much water. Luckily it flaked off and could be smoothed.


Attaching the torso was the epoxy way again…which was OK as it was hidden by his jacket so there is not really any groin he just has a hollowed out shape then filled with the epoxy to push the torso into place. Keeping the legs spread slightly  would balance out the weight more effectively.


 I then left it 24 hours to fully harden.


The following night was the addition of the arms, making any kinda detail to resemble fingers was tough going as I found the clay could be washed away or the opposite and looked like big fat sausages, so just left them as a basic indication of a hand shape.


Attached to the torso in the same way as the legs.


This guy sports a HUGE trilby, I really enjoyed making the hat but to go with an oversized hat, you get an oversized head…
 I hollowed out a small amount of clay so it could be placed onto the neck and filled and secured with the epoxy, rather than stuck on at an angle. I’m happy with that.
At this point though, this little man had more cracks than 18th century China…  fairly superficial cracks but still the potential  to become something more.


I reached for the ‘no more nails’ glue I had been sticking up the towel rail with earlier that night and filled them with that, then rubbed epoxy into them…. Ick… this was messy BUT it held together.


The need to disguise the cracks was fairly strong so decided to primer him and give his first coat. After it dried the details were added and the cape.


With the angle and bend in the back leg and foot withthe weight of the cape made the whole thing topple.
 So more support on the base was added with the creation of standing on rocks, it was easier to give support to the back leg this way.

So the final step of giving him the last coat of paint… so who is this guy?
This little man is called 711 he appeared in the first Police Comics alongside Plastic Man, Firebrand and the bad ass Mouthpiece. 711 got his name as this was his prison number from which he had escaped.
In true Golden Age style, they can’t keep it straight if his outfit is all shades of red or his cape is green. I chose the green as I thought it made him slightly more interesting.
What makes this guy important?

 He is the first character to ever be killed within comics something which these days means nothing as we know they will be back, but as far as I am aware 711 has not made a comeback, not even as a lantern of somekind or zombie!!! ;p


I have enjoyed the whole sculpting experience and I haven’t been put off by it.

I want to try again and not make the mistakes I did and already know who and what I want to attempt.
 It has made me far more aware and appreciative of the work and skill that goes into making figures.
 As a geek within an online geek community I think we can be all be too quick to call the shit out figures if they are not 100% comic accurate to how we visualise them.
 I am not talking about costume designs as that should be correct but we all perceive them slightly different and sometimes I think we should give these artists a break from our nerdom…
Granted I have hit 711 with the ugly stick but that is lack of ability, not that I wanted to.
Creating facial features I found the most complicated thing of all and will no longer look at ANY pre bought little man in the same way ever again!
So 711 stands his whole 9" on my desk next to my computer alongside of my very first paint job Spellbinder.
 For a first, I do feel it could have been a lot worse, but bring on the next one… let’s get some improvement going on this…